Scratch Assay Protocol & ImageJ Analysis: The Complete Guide (2025)
Everything you need to run a reproducible scratch assay — from cell seeding to publication-ready data. Includes a full step-by-step protocol, the complete ImageJ Wound Healing Size Tool guide, data interpretation, troubleshooting, and how to automate the entire workflow with zenCELL owl.
目录
- What is a scratch assay? Principle and terminology
- Scratch assay vs. Transwell vs. Boyden chamber
- Complete scratch assay protocol — step by step
- ImageJ analysis — Wound Healing Size Tool guide
- Calculating % wound closure and migration rate
- Migration vs. proliferation — Mitomycin C
- Troubleshooting common problems
- Automated alternative: zenCELL owl
1. What is a scratch assay? Principle and terminology
The 划痕检测 — also called the wound healing assay 或 cell migration assay — is one of the most widely used in vitro techniques in cell biology. It is simple, inexpensive and provides quantitative data on collective cell migration.
The principle in brief
A confluent monolayer of adherent cells is physically scratched to create a cell-free gap. Cells at the wound edge lose contact inhibition and begin migrating collectively to close the gap. The rate and extent of closure is monitored over time by microscopy and quantified as % wound closure 或 migration rate (µm/h).
The scratch assay mimics the in vivo wound healing process — where epithelial or endothelial cells migrate collectively to repair a tissue defect. This makes it a relevant model for studying cancer invasion, angiogenesis, tissue regeneration and drug effects on cell motility.
Scratch assay vs. wound healing assay vs. migration assay — what is the difference?
| Term | What it specifically means | When to use |
|---|---|---|
| Scratch assay | The method: a gap physically created by a pipette tip, stencil or device in a monolayer | Describing experimental setup in lab context |
| Wound healing assay | The biological model: cells migrating to close a wound, mimicking in vivo tissue repair | Regenerative medicine, dermatology, wound biology |
| Cell migration assay | Umbrella term covering scratch, Transwell, Boyden chamber and other methods | Publications, grants, method sections |
| 2D migration assay | Specifically the scratch assay, distinguishing from 3D invasion or Transwell methods | When explicitly contrasting with 3D models |
All three terms are used interchangeably in the literature. In publications, "wound healing assay" and "scratch assay" are equally accepted — both are correct for the same experimental approach.
2. Scratch assay vs. Transwell vs. Boyden chamber — which migration assay to use?
The scratch assay is the right choice for most migration studies — but understanding when other methods are more appropriate will help you make the right decision for your experimental question.
| 方法 | Measures | Kinetic data? | Complexity | 最佳 |
|---|---|---|---|---|
| 划痕/伤口愈合测定 | Collective 2D migration | ✓ Full timelapse | Low | Drug screening, wound healing models, HTS, first migration experiments |
| Transwell Migration | Individual cell chemotaxis | 仅终点 | Medium | Directional migration toward a gradient, serum chemotaxis |
| Boyden Chamber (Invasion) | Invasion through Matrigel | 仅终点 | Higher | Invasive potential of cancer cells through ECM |
| µ-Slide Insert (ibidi) | Collective 2D migration, defined gap | ✓ If live imaged | Medium | When ECM damage from pipette scratching must be avoided |
Choose the scratch assay when you need: kinetic data on collective migration, an inexpensive setup, compatibility with drug screening across many conditions, or a model for wound healing in vitro. It is the default first choice for most cell migration studies in cancer biology, regenerative medicine and pharmacology.
3. Complete scratch assay protocol — step by step
This protocol covers the standard 24-well plate format with manual pipette tip scratch creation. For a standardised, reproducible alternative, see the ScratchMaker system.
Materials needed
- Adherent cell line of choice (fibroblasts, epithelial, endothelial, cancer cells)
- 24-well tissue culture plates (standard or fibronectin/collagen-coated)
- P200 pipette with tips
- Complete growth medium + serum-reduced medium (0.5–2% FBS)
- PBS (for washing)
- Mitomycin C (optional — 10 µg/mL stock solution)
- Brightfield microscope or zenCELL owl in-incubator imager
- Marker pen (for labelling the plate bottom)
Part 1 — Cell preparation and seeding (Day before)
Goal: achieve a dense, healthy monolayer of >95% confluence at the time of scratching
Prepare cells for seeding
Passage cells 1–2 days before seeding to ensure cells are in exponential growth phase. Check viability before seeding — target ≥90% viable cells.
⏱ Day before experimentSeed cells in 24-well plate
Seed at a density that reaches >95% confluence within 16–24 hours of incubation.
- Typical density: 100,000–200,000 cells/well (adjust per cell line — fast-dividing lines need lower density)
- Volume: 500 µL–1 mL complete medium per well
- Incubate: 37°C, 5% CO₂, overnight (16–24h)
Verify confluence before proceeding
Confirm >95% confluence under the microscope. Subconfluent monolayers produce uneven gap edges and unreliable migration data. If not yet confluent, incubate for additional 2–4h.
⚠️ Do not proceed if confluence <90%Part 2 — Scratch creation (Day of experiment, T=0)
Goal: create a reproducible, straight gap of consistent width across all wells
Optional: Mitomycin C pre-treatment
If you need to separate migration from proliferation, add Mitomycin C (10 µg/mL) to all wells 2 hours before scratching. Aspirate before scratch creation.
- Required: assays >12h, fast-cycling cell lines (HeLa, A549), studies on drugs affecting proliferation
- Optional: slow cells, short assays (<12h), when combined effects are acceptable
Create the scratch with a pipette tip
Using a P200 pipette tip, draw a single straight line across the well in one continuous motion.
- Angle: hold the tip perpendicular (90°) to the plate bottom — angled tips produce wider, irregular scratches
- Pressure: moderate and consistent — pressing too hard causes the tip to skip; too light produces curved lines
- Direction: one direction only — no back-and-forth movement
- Tip size: P200 is standard (~400–600 µm width); P20 for narrower gaps
- Reference mark: draw a line on the plate bottom with a marker to ensure the same imaging position at every timepoint
Wash and replace medium — T=0 starts now
Immediately after scratching, gently aspirate medium and wash once with pre-warmed PBS. Replace with fresh medium ± compound.
- Serum concentration: 0.5–2% FBS reduces proliferation contribution; serum-free for migration-only readout
- Add compound: treatments are added at this point at 1× final concentration
- Volume: 500 µL/well — fills evenly without creating turbulence at the wound edge
Capture T=0 image within 15 minutes
Image all wells within 15 minutes of scratching. This is your baseline wound area for all % closure calculations. Position the microscope at the same reference mark for each well.
With zenCELL owl: place the plate on the device, set imaging interval (5–30 min), press Start. T=0 is captured automatically and all subsequent timepoints run unattended.
zenCELL owl: fully automated from this pointPart 3 — Imaging and monitoring
Goal: capture complete kinetics of gap closure with sufficient temporal resolution
Manual imaging (conventional approach)
Remove plate from incubator, image under inverted brightfield microscope at the reference mark, return plate to incubator.
- Typical intervals: 0h, 4h, 8h, 12h, 24h — or 0h, 8h, 24h for faster assays
- Consistent position: use the reference mark on the plate bottom at every timepoint
- Limitation: temperature shock, CO₂ loss, contamination risk at every removal; kinetics between timepoints are missing
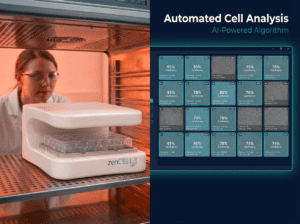
Automated imaging with zenCELL owl (recommended)
zenCELL owl sits inside the incubator and images all 24 wells every 5–30 minutes, continuously, without any plate removal.
- Interval for scratch assay: every 5–30 minutes (captures full kinetic curve)
- All 24 wells: imaged simultaneously under identical conditions
- Software: automatically calculates confluence per well at every timepoint → gap area → % closure → t½
- No intervention: zero temperature loss, zero CO₂ disruption, zero contamination risk
- Retrospective access: every timepoint retained — analyse any moment post-experiment
Assay duration and stopping point
Run until control wells reach 80–100% closure. Do not over-run — fully closed wounds cannot be quantified.
- Fast migrating cells (HeLa, MDA-MB-231, A549): 12–18h to full closure
- Moderate migrating cells (MCF-7, Caco-2, HUVEC): 20–36h
- Slow migrating cells (primary fibroblasts, hMSC): 36–72h
Running scratch assays regularly? The ScratchMaker creates physiologically clean gaps with <5% width variability — no pipette tip, no mechanical damage to cells or ECM. Combined with zenCELL owl, the complete workflow is automated and reproducible.
See the complete system →4. ImageJ scratch assay analysis — Wound Healing Size Tool guide
The most widely used free tool for scratch assay image analysis is the Wound Healing Size Tool plugin for ImageJ/Fiji, developed by Suarez-Arnedo et al. and published in PLoS ONE in 2020 — cited 979 times as of 2025. It automatically detects wound boundaries and calculates wound area, width and coverage without manual tracing.
Wound Healing Size Tool (Suarez-Arnedo et al., PLoS ONE 2020) — most cited, simple to use, batch mode available. Best starting point. | MRI Wound Healing Tool (Montpellier Resources Imagerie) — adds cell orientation/coherency analysis within the migrating front. | CSMA (IEEE Access 2025) — improved detection of cells migrating into the wound centre. | TScratch — MATLAB-based, good for large batch processing.
Step-by-step: Wound Healing Size Tool in ImageJ/Fiji
ImageJ Wound Healing Analysis Protocol
Wound Healing Size Tool (Suarez-Arnedo et al., PLoS ONE 2020)
Install Fiji (ImageJ with plugins)
Download Fiji from fiji.sc — free, open-source, works on Windows, Mac and Linux. Fiji includes most analysis plugins pre-installed.
Download and install the Wound Healing Size Tool
Search "Wound_healing_size_tool_updated" on the ImageJ plugin repository or the original PLoS ONE publication. Download the .zip file, unzip, and place the .ijm file into the Fiji.app/plugins/ folder. Restart Fiji.
Open your scratch assay image in 8-bit greyscale
File → Open to load a single image. For a timelapse series: File → Import → Image Sequence → select the folder. Then convert to 8-bit: Image → Type → 8-bit. This is required for the plugin's intensity-based wound detection algorithm.
Image → Type → 8-bitSet the scale (pixels → µm)
Go to Analyze → Set Scale. Enter the pixel/µm calibration from your microscope. This converts wound width from pixels to µm and enables migration rate calculation in µm/h. Check "Global" to apply to all subsequent images in the session.
Analyze → Set Scale → known distance in µmRun the Wound Healing Size Tool
Plugins → Wound_healing_size_tool. The plugin opens a dialogue with configurable parameters:
- Threshold: adjust if cell/background contrast is low (start with default, increase if edges are missed)
- Save results: ✓ check — auto-exports CSV to your chosen folder
- Show binary image: ✓ check for first run — lets you validate wound detection visually
- Add to ROI Manager: optional — shows detected wound outline
Click OK. The plugin detects wound boundaries using pixel intensity variance — wound pixels have similar intensity values, cell pixels have high variance.
Read results from the Results window
The Results window displays per image:
- Wound area (µm²): total cell-free area
- Wound width average (µm): mean distance between wound edges
- Wound coverage (%): wound area as % of total image area
- Width standard deviation: indicates scratch straightness — use this to identify irregular scratches
Export CSV and calculate % wound closure in Excel or GraphPad
File → Save As → Results (CSV). Import into GraphPad Prism or Excel. Calculate % wound closure using the T=0 wound area as reference (see formulas below).
Export: CSV · GraphPad Prism · ExcelConvert to 8-bit, then increase image contrast before running: Image → Adjust → Brightness/Contrast → Auto. The plugin relies on intensity difference between the wound (uniform background) and cell monolayer (high variance). Low contrast images produce poor detection. Phase contrast images typically work better than standard brightfield for this reason.
5. Calculating % wound closure and migration rate
Once you have wound area measurements at each timepoint, calculate the standard readouts:
% Wound closure
The most common and comparable metric. Normalised to T=0, directly comparable across experiments.
% Wound closure = (A₀ − Aₜ) / A₀ × 100 Where: A₀ = wound area at T=0 (immediately after scratching) Aₜ = wound area at time tMigration rate (µm/h)
Average velocity of the cell front moving into the wound. Calculated from wound width at two timepoints.
Migration rate (µm/h) = (Wᵢ − Wf) / (2 × t) Where: Wᵢ = initial wound width (µm) at T=0 Wf = final wound width (µm) at time t t = duration of migration (hours) ÷2 = because both edges migrate simultaneouslyt½ gap closure
Time to reach 50% wound closure. Useful for comparing treatments with different maximum closure rates or plateau kinetics. Read directly from the % wound closure vs. time curve — or calculated automatically by zenCELL owl software.
Statistical analysis
- Comparing two conditions at one timepoint: unpaired t-test
- Comparing two conditions across multiple timepoints: two-way ANOVA with Bonferroni correction
- Comparing migration rates: present as mean ± SD, n ≥ 3 independent experiments, ≥ 3 wells per condition
- Normalise within each experiment to account for day-to-day variation in scratch width
6. Migration vs. proliferation — when and how to use Mitomycin C
One of the most common questions in scratch assay experiments: is gap closure driven by cell migration, cell proliferation, or both?
In most adherent cell lines, gap closure involves both migration of cells from the wound edge and proliferation of cells behind the edge. Depending on your research question, you may need to separate these contributions.
| Scenario | Mitomycin C needed? | Reasoning |
|---|---|---|
| Short assay (<12h) with slow-dividing cells | 可选 | Proliferation contribution minimal in short timeframe |
| Long assay (>24h) with fast-dividing cell lines | 必需 | Proliferation significantly contributes to gap closure |
| Drug study affecting both migration and proliferation | 必需 | Must isolate migration effect from antiproliferative effect |
| Pure migration study (e.g. chemokinesis) | 必需 | Results must reflect motility only |
| Wound healing model (combined effect acceptable) | 不必 | In vivo wound healing involves both — combined readout is biologically valid |
Mitomycin C protocol
- Prepare stock solution: 10 mg/mL in DMSO, store at -20°C, protect from light
- Working concentration: 10 µg/mL in complete medium
- Pre-treatment: 2h before scratching at 37°C
- Aspirate Mitomycin C medium, wash once with PBS, then create scratch and replace with fresh medium
- Validate: run a parallel plate with BrdU or Ki67 staining at the end of the assay to confirm proliferation was blocked
With zenCELL owl, run unscratched reference wells in parallel in the same plate. Track confluence increase in these reference wells over time — this represents the proliferation component. Subtract from scratched well confluence change to isolate migration. This preserves cell health better than Mitomycin C treatment, which can have off-target effects.
7. Scratch assay troubleshooting — the 6 most common problems
Problem 1: Variable scratch width between wells or experiments
Cause: Manual pipette tip scratching introduces ±30–60% width variability depending on operator, angle, pressure and speed. This makes inter-assay comparison unreliable and inflates standard deviation in migration rate calculations.
Solutions:
- Always use the same operator with the same technique
- Use a straight-edge guide (ruler taped to the plate) for consistent scratch angle
- Use the ScratchMaker stencil system — reduces variability to <5% without operator dependency
- Normalise each well to its own T=0 area — reduces but does not eliminate the variability problem
Problem 2: Gap closes too quickly
Causes: High serum concentration driving proliferation rather than migration; incorrect cell seeding density leading to residual cells in the gap; fast-migrating cell line for your assay duration.
Solutions: Reduce serum to 0.5–2%; add Mitomycin C (10 µg/mL, 2h pre-treatment); widen the scratch using a larger tip; shorten the assay duration.
Problem 3: Cells detach at the scratch edge
Causes: Too much pressure with the pipette tip; subconfluent monolayer (cells not anchored tightly to neighbours); inadequate plate coating.
Solutions: Ensure >95% confluence before scratching; reduce pipette tip pressure; coat wells with fibronectin (1 µg/cm², 1h at RT) or collagen I before seeding; switch to ScratchMaker to eliminate mechanical force on the cells.
Problem 4: ImageJ fails to detect wound edges
Cause: Low contrast between the cell-free wound area and the cell monolayer — common with brightfield vs. phase contrast.
Solutions: Convert to 8-bit greyscale; enhance contrast (Image → Adjust → Brightness/Contrast → Auto); increase threshold parameter in the Wound Healing Size Tool; switch to phase contrast imaging if available — gives better cell/background contrast.
Problem 5: Results not reproducible between experiments
Causes: Variable scratch width; different cell passage numbers; inconsistent imaging positions; manual timepoint sampling introducing variable delays.
Solutions: ScratchMaker for consistent gaps; zenCELL owl for automated imaging at fixed intervals from the same position every time; use cells from the same passage range across experiments (±3 passages).
Problem 6: Scratch is curved, not straight
Cause: Pipette tip tilted during scratch; not using a straight-edge guide.
Solution: Hold tip perpendicular to the plate (90°); use a straight-edge guide; use ScratchMaker precision channel guide.
8. Automated scratch assay — how zenCELL owl changes the workflow
The scratch assay is conceptually simple — but in practice, manual execution introduces reproducibility problems at two critical steps: gap creation (variable width) and imaging (incomplete kinetics, incubator disruption, operator time). zenCELL owl addresses the imaging problem; the ScratchMaker addresses the gap creation problem.
| Manual workflow | Automated (ScratchMaker + zenCELL owl) | |
|---|---|---|
| Gap width variability | ±30–60% | <5% |
| Imaging intervals | Every 4–8h — kinetics missing | Every 5 min — complete trace |
| Conditions in parallel | Limited by operator time | 24 wells, identical conditions |
| Incubator disruption | At every timepoint | Zero |
| Analysis | Manual ImageJ per image | Automatic per well, every timepoint |
| Operator time (per experiment) | 3–5h over 24h assay | ~15 minutes setup only |
| Data export | Manual CSV after ImageJ | Direct CSV, PNG, AVI |
zenCELL owl costs €14,000 one-time — no annual licence, no subscription. For a lab running 3 scratch assays per week, that is approximately €2 per assay over 2 years, with complete kinetic data, zero incubator disruption and no operator time at the microscope.
See the automated scratch assay workflow live. 30-minute remote demo — real cells, ScratchMaker and zenCELL owl running together inside an incubator.
Book your free demo